组件开发
什么是组件
- 组件是可复用的Vue实例,具有独立的作用域
- 组件化开发有助于代码复用和维护
创建一个简单的组件
在项目的src\components目录下新建一个文件夹,命名为my-button,然后在此目录下新增一个文件index.vue编写如下代码:
<!-- eslint-disable vue/multi-word-component-names -->
<template>
    <button class="my-button default-color">我的按钮</button>
</template>
<script setup lang="ts"></script>
<style scoped>
.my-button {
    display: inline-flex;
    justify-content: center;
    align-items: center;
    line-height: 1;
    height: 32px;
    white-space: nowrap;
    cursor: pointer;
    text-align: center;
    box-sizing: border-box;
    outline: none;
    transition: .1s;
    font-weight: 500;
    user-select: none;
    vertical-align: middle;
    -webkit-appearance: none;
    padding: 8px 15px;
    font-size: 14px;
    border-radius: 4px;
    border: 1px solid #dcdfe6;
}

.default-color {
    color: #606266;
    background-color: #ffffff;
    border-color: #dcdfe6;
}
</style>
使用组件
<template>
  <div>
    <!-- 在这里引用即可 -->
    <my-button></my-button>
  </div>
</template>
<script setup lang="ts">
//导入组件 我们使用了setup语法 所以不用注册组件
import MyButton from "@/components/my-button/index.vue";
</script>
TIP
从这里开始,所有包含 .vue 文件引入的地方,可能会看到 @xx/xx.vue 这样的写法。
@/ 是 src/ 的路径别名
路径别名可以在 vite.config.ts 等构建工具配置文件里添加 alias
组件通信
父组件通过props传递数据给子组件
修改src\components\my-button\index.vue的代码,将其修改为
<!-- eslint-disable vue/multi-word-component-names -->
<template>
    <button class="my-button"
        :class="props.color == 'blue' ? 'blue' : props.color == 'green' ? 'green' : 'default-color'">{{ props.text
        }}</button>
</template>
<script setup lang="ts">
type MyColor = 'default' | 'blue' | 'green';

const props = withDefaults(defineProps<{
    text: string,
    color?: MyColor,//加上问号,代表这是个可选参数
}>(), {
    color: 'default' //此处可以定义默认值
})
</script>
<style scoped>
.my-button {
    display: inline-flex;
    justify-content: center;
    align-items: center;
    line-height: 1;
    white-space: nowrap;
    cursor: pointer;
    text-align: center;
    box-sizing: border-box;
    outline: none;
    transition: .1s;
    font-weight: 500;
    user-select: none;
    vertical-align: middle;
    -webkit-appearance: none;
    padding: 8px 15px;
    font-size: 14px;
    border-radius: 4px;
    border: 1px solid #dcdfe6;
}

.default-color {
    color: #606266;
    background-color: #ffffff;
    border-color: #dcdfe6;
}

/* 新增两个颜色的样式 */
.blue {
    color: #ffffff;
    background-color: #409eff;
    border-color: #409eff;
}

.green {
    color: #ffffff;
    background-color: #67c23a;
    border-color: #67c23a;
}
</style>在这里我们定义了一个变量叫做props,它通过 withDefaults 编译器宏和defineProps() 宏函数显式声明它所接受的 props,这样 Vue 才能知道外部传入的哪些是 props,哪些是透传 attribute
父组件
<template>
  <div>
    <my-button text="蓝色按钮" color="blue"></my-button>
    <my-button :text="text" color="green"></my-button>
  </div>
</template>
<script setup lang="ts">
import MyButton from "@/components/my-button/index.vue";
import { ref } from "vue";
const text = ref("绿色按钮")
</script>
Prop 名字格式
如果一个 prop 的名字很长,应使用 camelCase 形式,因为它们是合法的JavaScript标识符,可以直接在模板的表达式中使用,也可以避免在作为属性 key 名时必须加上引号。
defineProps({
  greetingMessage: String
})<span>{{ greetingMessage }}</span>虽然理论上你也可以在向子组件传递 props 时使用 camelCase 形式 ,但实际上为了和 HTML attribute 对齐,我们通常会将其写为 kebab-case 形式:
<MyComponent greeting-message="hello" />对于组件名我们推荐使用PascalCase,因为这提高了模板的可读性,能帮助我们区分Vue组件和原生HTML元素。然而对于传递props 来说,使用camelCase并没有太多优势,因此我们推荐更贴近 HTML 的书写风格。
import MyButton from "@/components/my-button/index.vue";单向数据流
所有的 props 都遵循着单向绑定原则,props 因父组件的更新而变化,自然地将新的状态向下流往子组件,而不会逆向传递。这避免了子组件意外修改父组件的状态的情况,不然应用的数据流将很容易变得混乱而难以理解。
另外,每次父组件更新后,所有的子组件中的 props 都会被更新到最新值,这意味着你不应该在子组件中去更改一个 prop。若你这么做了,Vue 会在控制台上向你抛出警告:
const props = withDefaults(defineProps<{
    text: string,
}>(), {
})
// // ❌ 警告!prop 是只读的!
props.text = '测试修改'
导致你想要更改一个 prop 的需求通常来源于以下两种场景:
prop 被用于传入初始值;而子组件想在之后将其作为一个局部数据属性。在这种情况下,最好是新定义一个局部数据属性,从 props 上获取初始值即可:
vue<template> <button class="my-button" :class="props.color == 'blue' ? 'blue' : props.color == 'green' ? 'green' : 'default-color'">{{ new_text }}</button> </template> <script setup lang="ts"> import { ref } from 'vue'; type MyColor = 'default' | 'blue' | 'green'; const props = withDefaults(defineProps<{ text: string, color?: MyColor,//加上问号,代表这是个可选参数 }>(), { color: 'default' //此处可以定义默认值 }) // 注意 new_text 不会再随着props.text改变而改变 const new_text = ref(props.text) </script>父组件
vue<template> <div> <div>父组件:{{ text }}</div> <my-button :text="text" color="green"></my-button> </div> </template> <script setup lang="ts"> import MyButton from "@/components/my-button/index.vue"; import { ref } from "vue"; const text = ref("绿色按钮"); setTimeout(() => { text.value = "绿色按钮123"; }, 2000); </script>需要对传入的 prop 值做进一步的转换。在这种情况中,最好是基于该 prop 值定义一个计算属性:
jsconst props = withDefaults(defineProps<{ text: string }>(), { }) // 只会更改子组件的text,不会影响父组件的text const new_text = computed(() => props.text.toLocaleLowerCase())
更改对象 / 数组类型的 props
当对象或数组作为 props 被传入时,虽然子组件无法更改 props 绑定,但仍然可以更改对象或数组内部的值。这是因为 JavaScript 的对象和数组是按引用传递,对 Vue 来说,阻止这种更改需要付出的代价异常昂贵。
子组件
<template>
    <button class="my-button"
        :class="props.config.color == 'blue' ? 'blue' : props.config.color == 'green' ? 'green' : 'default-color'">{{
            props.config.text
        }}</button>
</template>
<script setup lang="ts">

type MyColor = 'default' | 'blue' | 'green';
interface IConfig {
    text: string,
    color?: MyColor,//加上问号,代表这是个可选参数
}
const props = withDefaults(defineProps<{
    config: IConfig
}>(), {

})
setTimeout(() => {
    props.config.color = 'green'
}, 2000)
</script>
父组件
<template>
  <div>
    <div>父组件:{{ config }}</div>
    <my-button :config="config" color="green"></my-button>
  </div>
</template>
<script setup lang="ts">
import MyButton from "@/components/my-button/index.vue";
import { ref } from "vue";
const config = ref({
  text: "蓝色",
  color: "blue",
});
</script>父组件的config会提示类型不兼容,是因为此时把我们的color属性解析成了string类型。我们可以将类型单独提取出来写到一个文件里
type MyColor = 'default' | 'blue' | 'green';
export interface IConfig {
    text: string,
    color?: MyColor,//加上问号,代表这是个可选参数
}这种更改的主要缺陷是它允许了子组件以某种不明显的方式影响父组件的状态,可能会使数据流在将来变得更难以理解。在最佳实践中,你应该尽可能避免这样的更改,除非父子组件在设计上本来就需要紧密耦合。在大多数场景下,子组件应该使用emits来通知父组件做出改变。参考后文的:子组件调用父组件
透传
“透传 attribute”指的是传递给一个组件,却没有被该组件声明为 props 或 emits 的 attribute 或者 v-on 事件监听器。最常见的例子就是 class、style 和 id。
当一个组件以单个元素为根作渲染时,透传的 attribute 会自动被添加到根元素上。举例来说,假如我们有一个 <MyButton> 组件,它的模板长这样:
<!-- <MyButton> 的模板 -->
<button>Click Me</button>
一个父组件使用了这个组件,并且传入了 class:
<MyButton class="large" />最后渲染出的 DOM 结果是:
<button class="large">Click Me</button>这里,<MyButton> 并没有将 class 声明为一个它所接受的 prop,所以 class 被视作透传 attribute,自动透传到了 <MyButton> 的根元素上。
对 class 和 style 的合并
如果一个子组件的根元素已经有了 class 或 style attribute,它会和从父组件上继承的值合并。如果我们将之前的 <MyButton> 组件的模板改成这样:
<button class="btn">Click Me</button>则最后渲染出的 DOM 结果会变成:
<button class="btn large">Click Me</button>v-on 监听器继承
同样的规则也适用于 v-on 事件监听器:
<MyButton @click="onClick" />click 监听器会被添加到 <MyButton> 的根元素,即那个原生的 <button> 元素之上。当原生的 <button> 被点击,会触发父组件的 onClick 方法。同样的,如果原生 button 元素自身也通过 v-on 绑定了一个事件监听器,则这个监听器和从父组件继承的监听器都会被触发。
深层组件继承
有些情况下一个组件会在根节点上渲染另一个组件。例如,我们重构一下 <MyButton>,让它在根节点上渲染 <BaseButton>:
<BaseButton />此时 <MyButton> 接收的透传 attribute 会直接继续传给 <BaseButton>。
请注意:
- 透传的 attribute 不会包含
<MyButton>上声明过的 props 或是针对emits声明事件的v-on侦听函数,换句话说,声明过的 props 和侦听函数被<MyButton>“消费”了。 - 透传的 attribute 若符合声明,也可以作为 props 传入
<BaseButton>。
禁用 Attributes 继承
如果你不想要一个组件自动地继承 attribute,你可以在组件选项中设置 inheritAttrs: false。
<script setup>
defineOptions({
  inheritAttrs: false
})
// ...setup 逻辑
</script>
多根节点的 Attributes 继承
和单根节点组件有所不同,有着多个根节点的组件没有自动 attribute 透传行为。如果 $attrs 没有被显式绑定,将会抛出一个运行时警告。
<my-button text="蓝色按钮" color="blue" class="test"></my-button>如果 <my-button> 有下面这样的多根节点模板,由于 Vue 不知道要将 attribute 透传到哪里,所以会抛出一个警告。
<button>{{ props.text}}</button>
<div>测试透传</div>
如果 $attrs 被显式绑定,则不会有警告:
<button>{{ props.text}}</button>
<div v-bind="$attrs">测试透传</div>父组件通过ref操作子组件
父组件可以给子组件绑定 ref 属性,然后通过 Ref 变量操作子组件的数据或者调用子组件里面的方法。
先在 <template /> 处给子组件标签绑定 ref 属性:
<!-- Father.vue -->
<template>
  <Child ref="child" />
</template>
然后在 <script /> 部分定义好对应的变量名称 child ,即可通过该变量操作子组件上的变量或方法:
 <!-- Father.vue -->
import Child from "@/components/Child/index.vue";
const child = ref<InstanceType<typeof Child>>()
需要注意的是,在子组件 Child.vue 里,变量和方法也需要defineExpose暴露出来才可以被父组件调用到。
defineExpose({})示例
封装子组件
<template>
    <div>子组件的num是{{ num }}</div>
</template>
<script setup lang="ts">
import { ref } from 'vue';
const num = ref(0);
const resetNum = () => {
    num.value = 0;
};
defineExpose({
    num,
    resetNum
})
</script>
<style scoped></style>
调用子组件
<template>
<div>
<my-button ref="myBtn"></my-button>
<div>
<button @click="add">num++</button>
<button @click="reset">重置num</button>
</div>
</div>
</template>
<script setup lang="ts">
import MyButton from "@/components/my-button/index.vue";
import { ref } from "vue";
const myBtn = ref<InstanceType<typeof MyButton>>();
const add = () => {
if (myBtn.value) {
myBtn.value.num++
}
};
const reset = () => {
if (myBtn.value) {
myBtn.value.resetNum()
}
}
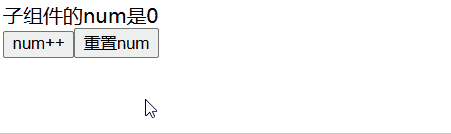
</script>查看效果
子组件调用父组件
子组件可以通过emits调用父组件的函数。
父组件
<template>
  <div>
    <!-- 使用v-on绑定子组件的emits -->
    <my-button @test-alert="test"></my-button>
  </div>
</template>
<script setup lang="ts">
import MyButton from "@/components/my-button/index.vue";
const test = (text: string) => {
  alert(text);
};
</script>
子组件
<template>
    <button @click="onClick">弹提示</button>
</template>
<script setup lang="ts">
const emits = defineEmits(['testAlert']);//定义emits
const onClick = () => {
    emits('testAlert', '你好,我是子组件控制弹出来的提示');//通知父组件调用此emits
}
</script>
<style scoped></style>
双向绑定组件封装
在之前的表单输入绑定课程里,我们讲到过v-model这个指令,如果我们想自己封装一个支持v-model的组件,可以把v-model理解成props和emit的一个结合的简写
// 以下两种写法是等价的
<Child
  :modelValue="foo"
  @update:modelValue="$event => (foo = $event)"
/>
<Child v-model="foo"/>
子组件定义如下
<!-- Child.vue -->
<script setup>
const props = defineProps(['modelValue'])
const emit = defineEmits(['update:modelValue'])
</script>

<template>
  <input
    :value="props.modelValue"
    @input="emit('update:modelValue', $event.target.value)"
  />
</template>
v-model 的参数
组件上的 v-model 也可以接受一个参数
父组件
<template>
  <div>
    <my-button v-model:text="str"></my-button>
    {{ str }}
  </div>
</template>
<script setup lang="ts">
import MyButton from "@/components/my-button/index.vue";
import { ref } from "vue";
const str = ref('');
</script>
子组件
<template>
    <input type="text" :value="props.text" @input="emits('update:text', ($event.target as any).value)" />
</template>
<script setup lang="ts">
const props = withDefaults(defineProps<{
    text: string
}>(), {

})
const emits = defineEmits(['update:text']);
</script>
<style scoped></style>
配合参数的使用,我们可以将多个props进行双向绑定
子组件
<script setup>
defineProps({
  firstName: String,
  lastName: String
})

defineEmits(['update:firstName', 'update:lastName'])
</script>

<template>
  <input
    type="text"
    :value="firstName"
    @input="$emit('update:firstName', $event.target.value)"
  />
  <input
    type="text"
    :value="lastName"
    @input="$emit('update:lastName', $event.target.value)"
  />
</template>
父组件
<UserName
  v-model:first-name="first"
  v-model:last-name="last"
/>
配合计算属性
在开发中我们有些时候可能需要手动去更新v-model的值,此时配合计算属性,则可以很方便的实现
子组件
<!-- eslint-disable vue/multi-word-component-names -->
<template>
    <div>子组件接收到的值{{ props.modelValue }}</div>
</template>
<script setup lang="ts">
import { computed } from 'vue';

const props = withDefaults(defineProps<{
    modelValue: string
}>(), {

})
const emits = defineEmits(['update:modelValue']);
const test = computed({
    get() {
        return props.modelValue
    },
    set(val) {
        emits('update:modelValue', val)
    }
});
setTimeout(() => {
    test.value = '456'//变相的实现了计算属性当成ref使用
}, 2000)
</script>
<style scoped></style>
父组件
<template>
  <div>
    <div>父组件要传的值{{ str }}</div>
    <my-button v-model="str"></my-button>
  </div>
</template>
<script setup lang="ts">
import MyButton from "@/components/my-button/index.vue";
import { ref } from "vue";
const str = ref('123');
</script>